Connecting a generator to your house without a transfer switch can be tricky. It’s possible but requires careful planning and safety measures.
Many homeowners face power outages and need a generator. But transfer switches can be expensive. Knowing how to connect a generator without one can save money. This guide will help you understand the process. You’ll learn the essentials and avoid common pitfalls.
Safety is key, so we’ll cover important precautions. Let’s explore how you can power your home efficiently and safely.
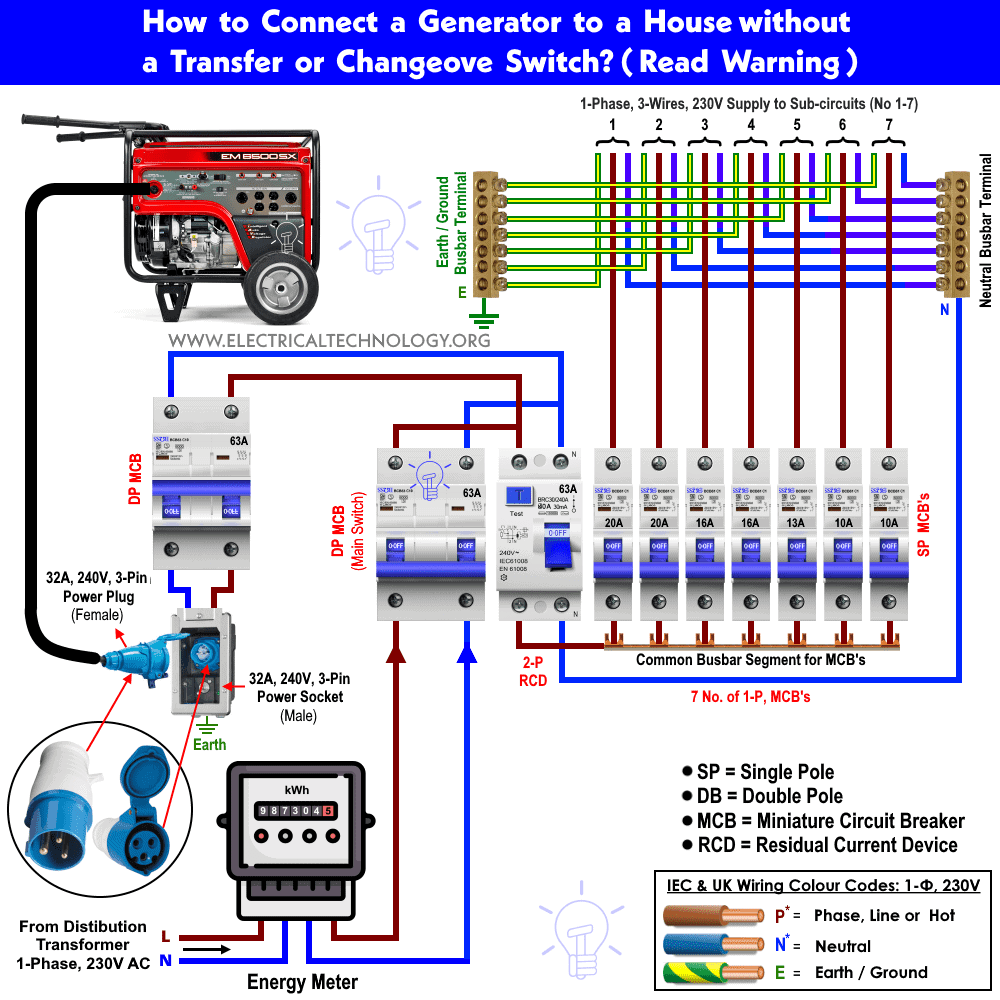
Credit: www.electricaltechnology.org
Safety First
Connecting a generator to your house without a transfer switch can be a risky venture. Safety should always be your top priority. A direct connection poses many dangers, so taking the right precautions is crucial. This section will guide you through the necessary safety measures to ensure a safe connection.
Risks Of Direct Connection
Directly connecting a generator to your house can lead to severe hazards. Understanding these risks can help you take appropriate precautions.
- Backfeeding: This occurs when electricity flows backward into the power lines. It can injure utility workers or cause fires.
- Overloading: Connecting too many devices can overload the generator. This may cause it to overheat and fail.
- Electrocution: Improper wiring or faulty connections can result in electrocution. Always ensure wires are insulated and connections are secure.
- Fire Hazards: Incorrect setups can cause sparks, leading to fires. Ensure all connections are tight and cables are in good condition.
| Risk | Description |
|---|---|
| Backfeeding | Electricity flows backward, endangering utility workers and causing fires. |
| Overloading | Too many devices can overheat and damage the generator. |
| Electrocution | Faulty wiring or connections can lead to serious injury or death. |
| Fire Hazards | Sparks from poor connections can cause fires. |
Protective Gear
Wearing the right protective gear is essential when connecting a generator. This helps minimize the risk of injury and ensures a safer setup.
- Insulated Gloves: These protect your hands from electric shocks. Make sure they are rated for the voltage you are working with.
- Safety Goggles: Goggles protect your eyes from sparks and debris. Always wear them when working with electrical connections.
- Rubber-soled Shoes: These provide additional insulation. They reduce the risk of electrocution by preventing grounding.
- Fire Extinguisher: Keep one nearby in case of emergencies. Make sure it is rated for electrical fires (Class C).
Here’s a quick checklist of the protective gear you need:
- Insulated Gloves
- Safety Goggles
- Rubber-soled Shoes
- Fire Extinguisher
Using this gear helps ensure your safety. Always double-check your equipment before starting any work.
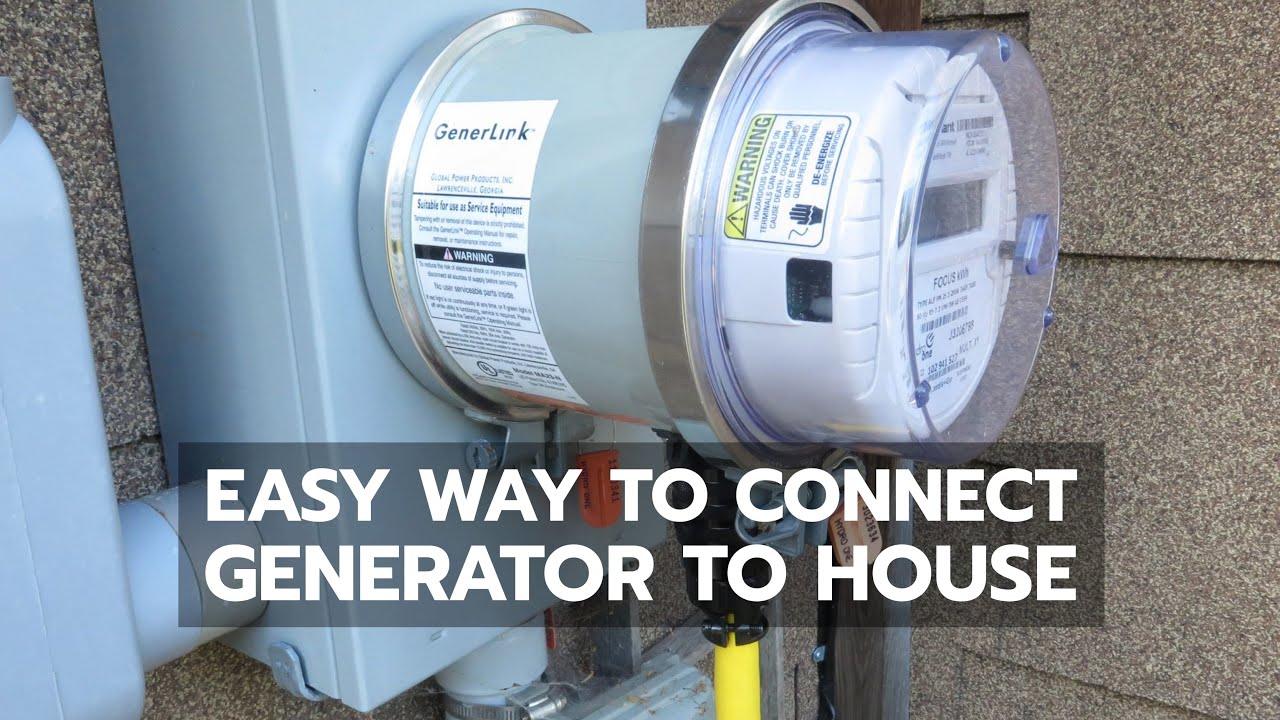
Credit: www.youtube.com
Tools Needed
Connecting a generator to your house without a transfer switch can be done safely if you have the right tools and follow proper guidelines. This guide will walk you through the tools needed for the job. Ensuring you have the correct equipment and supplies will make the process smoother and safer.
Essential Equipment
You need several essential pieces of equipment to connect your generator to your house safely. These items ensure a secure and functional setup.
- Generator: Select a generator that matches your power needs.
- Extension Cords: Use heavy-duty, outdoor-rated extension cords.
- Power Inlet Box: This allows the generator to be connected to your home’s electrical system.
- Breaker Interlock Kit: Ensures the generator and main power cannot run simultaneously, preventing backfeeding.
- Double Pole Breaker: Matches the amperage rating of your generator.
- Circuit Breaker Panel: This is where you’ll install the interlock kit and double pole breaker.
Below is a table summarizing the essential equipment:
| Equipment | Description |
|---|---|
| Generator | Provides backup power |
| Extension Cords | Heavy-duty, outdoor-rated |
| Power Inlet Box | Connects generator to home |
| Breaker Interlock Kit | Prevents backfeeding |
| Double Pole Breaker | Matches generator’s amperage |
| Circuit Breaker Panel | Houses breakers and interlock |
Recommended Supplies
Beyond the essential equipment, several supplies will help ensure your setup is safe and efficient. These supplies might not be mandatory, but they can help streamline the process and enhance safety.
- Electrical Tape: Use for securing connections and adding extra insulation.
- Wire Nuts: Essential for joining wires securely.
- Voltage Tester: Ensures that wires are de-energized before working on them.
- Drill and Drill Bits: Needed for mounting the power inlet box and other components.
- Cable Clamps: Helps in securing cables and preventing them from moving.
- Safety Gear: Includes gloves and safety glasses to protect yourself during installation.
Below is a table summarizing the recommended supplies:
| Supplies | Description |
|---|---|
| Electrical Tape | Secures connections |
| Wire Nuts | Securely joins wires |
| Voltage Tester | Checks if wires are live |
| Drill and Drill Bits | For mounting components |
| Cable Clamps | Secures cables |
| Safety Gear | Protects during installation |
Having these tools and supplies will help you connect your generator to your house without a transfer switch efficiently and safely. Remember, safety first!
Generator Selection
When thinking about connecting a generator to your house without a transfer switch, selecting the right generator is crucial. The generator you choose will determine the power available to your home appliances and ensure safe and efficient operation. Let’s explore the factors to consider in generator selection.
Choosing The Right Size
Choosing the right size generator is essential. An undersized generator can overload and fail, while an oversized one can be costly and inefficient. Follow these steps to find the correct size:
- List Essential Appliances: Identify the essential appliances you need during a power outage, such as the refrigerator, lights, and heating system.
- Calculate Wattage: Find the wattage requirements of each appliance. This information is usually on the appliance label or in the manual.
- Add Total Wattage: Sum the wattage of all appliances to determine the total power requirement.
- Consider Starting Watts: Some appliances need more power to start than to run. Factor in these additional starting watts.
Here’s a simple table to help you understand the wattage requirements:
| Appliance | Running Watts | Starting Watts |
|---|---|---|
| Refrigerator | 600 | 1200 |
| Lights | 300 | 300 |
| Heating System | 1500 | 1500 |
Total your needs and select a generator that can handle the combined wattage with some extra capacity for safety.
Fuel Types Explained
Generators come with different fuel types. Each type has its pros and cons. Understanding these can help you make an informed decision.
- Gasoline: Gasoline generators are common and widely available. They are easy to refuel, but gasoline has a short shelf life and can be dangerous to store.
- Diesel: Diesel generators are efficient and have a longer lifespan. Diesel is safer to store than gasoline, but diesel generators can be noisy and more expensive upfront.
- Propane: Propane generators are clean-burning and have a long shelf life. They are quieter but require a large storage tank, which can be costly and cumbersome.
- Natural Gas: Natural gas generators offer an unlimited fuel supply if your home is connected to a natural gas line. They are low maintenance, but installation can be complicated and expensive.
Here’s a comparison table to summarize fuel types:
| Fuel Type | Pros | Cons |
|---|---|---|
| Gasoline | Widely available, easy to refuel | Short shelf life, dangerous to store |
| Diesel | Efficient, long lifespan | Noisy, expensive |
| Propane | Clean-burning, long shelf life | Requires large storage tank, costly |
| Natural Gas | Unlimited supply, low maintenance | Complicated installation, expensive |
Choose the fuel type that best fits your needs, considering availability, storage, and cost.
Wiring Basics
Connecting a generator to your house without a transfer switch can be challenging. Understanding the basics of wiring is crucial for safety and efficiency. This guide covers essential topics like voltage and wire gauge, helping you set up your generator correctly.
Understanding Voltage
Voltage is the force that pushes electrical current through a circuit. It’s measured in volts (V). In most homes, standard voltage is 120V for regular outlets and 240V for large appliances.
When wiring a generator, it’s important to match the voltage of your generator to your home’s requirements. Here’s a quick guide:
- 120V: Suitable for lights, small appliances, and electronics.
- 240V: Needed for large appliances like ovens, dryers, and HVAC systems.
If your generator provides both 120V and 240V, you can connect it to different circuits in your home. Always check the generator’s manual for specific voltage ratings.
To ensure proper voltage distribution:
- Use a multimeter to measure voltage output.
- Verify that outlets and appliances match the generator’s voltage.
- Double-check connections to avoid overloading circuits.
Improper voltage can damage appliances or cause electrical hazards. Careful planning ensures safe and efficient power distribution.
Wire Gauge Importance
Wire gauge refers to the thickness of the wire. It’s measured in American Wire Gauge (AWG). The lower the AWG number, the thicker the wire. Thicker wires carry more current and reduce the risk of overheating.
Choosing the right wire gauge is critical. Here’s a simple table to guide you:
| Wire Gauge (AWG) | Maximum Amps | Use Case |
|---|---|---|
| 14 | 15 | Lights, small appliances |
| 12 | 20 | Outlets, small tools |
| 10 | 30 | Large appliances, power tools |
| 8 | 40 | HVAC systems, heavy-duty equipment |
To choose the right wire gauge:
- Identify the total current load (in amps) of the connected devices.
- Select a wire gauge that supports the total load.
- Consider the length of the wire. Longer wires need thicker gauges to prevent voltage drop.
Using the correct wire gauge prevents overheating and reduces fire risk. Always follow local electrical codes and consult a professional if unsure.
Connecting To The Main Panel
Connecting your generator to your house without a transfer switch can be tricky. One of the most crucial steps is connecting to the main panel. This process requires precision and safety measures. Here’s how to do it effectively.
Identifying Main Breaker
Before starting, ensure your generator is off and unplugged. The main breaker is the key component for connecting to your house. It controls the flow of electricity from your generator to your home.
Follow these steps to identify the main breaker:
- Open your main electrical panel: Typically located in the basement, garage, or utility room.
- Look for a large breaker at the top: This is usually the main breaker.
- Check the amperage rating: The main breaker will have a higher amperage rating (usually 100-200 amps) than other breakers.
Here’s a simple table to understand the main breaker’s position:
| Component | Location |
|---|---|
| Main Breaker | Top of the panel |
| Individual Breakers | Below the main breaker |
Ensure all individual breakers are off before proceeding. This will help prevent electrical overloads and ensure safety.
Connection Points
Once you’ve identified the main breaker, you need to locate the connection points. These points are where you will connect the generator to the panel.
Follow these steps to find the connection points:
- Locate the inlet box: This is where you will plug your generator.
- Identify the backfeed breaker: This breaker connects the generator’s power to the main panel.
- Install an interlock kit: This ensures the generator and main power cannot be on simultaneously.
Here’s a quick reference table for the connection points:
| Connection Point | Function |
|---|---|
| Inlet Box | Connects generator to panel |
| Backfeed Breaker | Transfers power to main panel |
| Interlock Kit | Prevents simultaneous power sources |
Ensure all connections are secure and follow local electrical codes. This will help prevent accidents and ensure a reliable connection.
Alternative Connection Methods
Connecting a generator to your house without a transfer switch can be challenging but not impossible. Alternative connection methods exist that can help you achieve this goal safely and effectively. This article explores two primary methods: using extension cords and direct wiring options.
Using Extension Cords
Using extension cords is a straightforward way to connect a generator to your house without a transfer switch. This method is simple and requires minimal equipment. Here’s how you can use extension cords safely and effectively:
- Choose the Right Extension Cord: Use heavy-duty extension cords that can handle the wattage of your generator. Look for cords with a high gauge rating and grounded plugs.
- Connect the Generator: Place the generator outside, away from windows and doors. Plug the extension cords into the generator’s outlets.
- Run Cords into the House: Carefully run the extension cords into your home through a window or door. Make sure the cords are not pinched or damaged.
- Plug in Appliances: Connect your essential appliances directly to the extension cords. Avoid overloading the cords by plugging in too many devices.
Advantages of Using Extension Cords:
| Advantages | Details |
|---|---|
| Simplicity | No need for complex installations. |
| Cost-Effective | Requires minimal investment. |
| Flexibility | Easy to move and reposition. |
Direct Wiring Options
Direct wiring options offer a more permanent solution for connecting your generator to your house without a transfer switch. This method involves integrating the generator into your home’s electrical system. Here’s how to go about it:
- Install a Generator Interlock Kit: This device allows you to safely connect your generator to your home’s electrical panel. It prevents the generator and utility power from running simultaneously.
- Hire a Licensed Electrician: Direct wiring is complex and potentially dangerous. A licensed electrician can ensure the installation is safe and up to code.
- Connect the Generator: The electrician will connect the generator to your home’s electrical panel using a dedicated breaker. This setup allows you to power multiple circuits in your home.
- Test the System: Once installed, test the system to ensure everything works correctly. The electrician will verify that the interlock kit functions properly and that the generator supplies power to the chosen circuits.
Advantages of Direct Wiring:
| Advantages | Details |
|---|---|
| Efficiency | Powers multiple circuits at once. |
| Safety | Reduces the risk of backfeed. |
| Convenience | No need to run extension cords. |
Testing The Setup
Connecting a generator to your house without a transfer switch requires careful planning and execution. Once everything is set up, testing the setup is crucial to ensure it works correctly and safely. This process involves several steps to verify all components and connections are functioning as intended.
Initial Checks
Before starting the generator, conduct initial checks to ensure everything is in place and functioning properly. Follow these steps for a thorough inspection:
- Verify Connections: Check all connections between the generator and your house. Ensure cables are securely attached and there are no loose ends.
- Inspect Cables: Look for any signs of wear or damage on the cables. Replace any cables that appear frayed or damaged.
- Check Fuel Levels: Ensure the generator has enough fuel for a test run. Running out of fuel mid-test could cause unnecessary complications.
- Examine the Generator: Inspect the generator for any visible issues. Look for oil leaks, unusual wear, or any parts that may need attention.
Once these initial checks are complete, you can proceed to start the generator. Allow it to run for a few minutes to stabilize. During this time, monitor the generator for any unusual sounds or behaviors. If everything appears normal, you can move on to load testing.
Load Testing
Load testing involves connecting household appliances to the generator to ensure it can handle the electrical load. Follow these steps for effective load testing:
- Start with Light Loads: Begin by connecting smaller appliances such as lights, fans, or a TV. This will help you gauge the generator’s initial performance.
- Monitor Performance: Observe how the generator handles these light loads. Check for any fluctuations in power or unusual noises.
- Gradually Increase the Load: Slowly add more appliances to the generator. Include larger devices like refrigerators, washing machines, or heaters.
- Check Voltage and Frequency: Use a multimeter to measure the generator’s voltage and frequency. Ensure they stay within the safe range for your appliances.
During load testing, keep an eye on the generator’s performance. If it struggles or shows signs of strain, reduce the load immediately. Record the maximum load the generator handles comfortably. This information will help you understand its capacity and limits.
By conducting these tests, you can ensure your generator setup is safe and reliable. Proper testing helps prevent issues and ensures your home remains powered during outages.

Credit: www.youtube.com
Maintenance Tips
Connecting a generator to your house without a transfer switch can be a cost-effective solution during power outages. However, maintaining your generator is crucial to ensure it runs smoothly when needed. Let’s discuss some essential maintenance tips.
Regular Inspections
Regular inspections are vital for keeping your generator in top condition. Inspect your generator every month to identify any potential issues early. This can prevent bigger problems later. Here’s a checklist of what to inspect:
- Air Filters: Ensure they are clean and free from debris.
- Spark Plugs: Check for wear and tear. Replace if necessary.
- Connections: Look for any loose or corroded connections.
- Battery: Ensure the battery is charged and in good condition.
- Wiring: Inspect wiring for any signs of damage or fraying.
Keeping a log of your inspections can help track your generator’s health. Note the date of each inspection and any issues found. This can be useful for planning maintenance and repairs.
Consider scheduling professional inspections at least once a year. A professional can spot problems that might be missed during routine checks. They can also perform more complex maintenance tasks.
Fuel And Oil Care
Fuel and oil are the lifeblood of your generator. Taking care of them is crucial for reliable operation. Here are some tips for fuel and oil maintenance:
- Fuel Quality: Use fresh, high-quality fuel. Avoid using old or contaminated fuel.
- Fuel Storage: Store fuel in a cool, dry place. Use stabilizers to extend shelf life.
- Fuel System: Regularly check the fuel system for leaks or blockages.
- Oil Level: Check the oil level before each use. Top up as needed.
- Oil Changes: Change the oil after every 100 hours of use or as recommended by the manufacturer.
Using the right type of oil is crucial. Refer to your generator’s manual for the recommended oil type. Different generators might require different types of oil.
Keeping a maintenance schedule for oil changes is a good practice. Below is a simple table to help you track oil changes:
| Date | Oil Changed | Next Change Due |
|---|---|---|
| 01/01/2023 | Yes | 01/04/2023 |
| 01/04/2023 | Yes | 01/07/2023 |
Maintaining your generator’s fuel and oil systems will ensure it runs efficiently when you need it most. Regular care can extend the life of your generator and provide peace of mind during power outages.
Frequently Asked Questions
Can You Run A Generator Without A Transfer Switch?
Yes, you can run a generator without a transfer switch. Use manual methods to connect appliances directly. Always follow safety guidelines.
How Do I Hook A Generator To My House Directly?
Hire a licensed electrician to install a transfer switch. Connect your generator to the switch for safe operation.
What Is The Alternative To A Transfer Switch For A Generator?
An interlock kit is an alternative to a transfer switch for a generator. It allows safe backfeeding to your electrical panel.
Can I Just Plug A Generator Into An Outlet?
No, you cannot just plug a generator into an outlet. It is dangerous and can cause backfeeding. Use a transfer switch.
What Is A Transfer Switch For A Generator?
A transfer switch connects your generator to your home’s electrical system safely.
Can I Connect A Generator Without A Transfer Switch?
Yes, you can, but it’s not recommended due to safety risks.
What Are The Risks Of Connecting Without A Transfer Switch?
Fire hazards, electrical shock, and damage to your home’s electrical system.
How Can I Connect A Generator To My House Safely?
Use an interlock kit or hire a professional electrician.
Conclusion
Connecting a generator to your house without a transfer switch can be tricky. Safety is key. Always follow the right steps and use proper equipment. This ensures you avoid accidents and power issues. Remember, an electrician’s help is valuable. They can guide you through the process.
Stay safe and enjoy reliable power. Your home’s power needs can be met effectively. Happy powering!